HERE'S THE DEAL SPICE CO.
  • Home
  • Products
  • Recipes
  • Find Us
  • FAQs
  • About

BBQ Rib Rub – Best Damn Chili

2/11/2022

0 Comments

 
Picture
Directions
  1. Prep Ingredients Above before Starting, Reserve each Item in separate bowls.
  2. In Large Stock Pot (12 quart) Add 2 TBL Extra Virgin Olive Oil, Heat over Medium High Heat.
  3. Once Hot, Add 3 pounds Ground Beef, break up and cook until evenly browned and shows no signs of pink.
  4. Strain through Colander with a Bowl under to catch the Fat and Liquid.
  5. Cool the browned ground beef and Reserve for later.  Discard the Fat and Liquid.
  6. In same 12 Quart Stock Pot, Add 2 TBL Extra Virgin Olive oil, Heat over Medium High Heat.
  7. Once Hot, Add 3 cups Diced Yellow onion, ¼ cup Minced Garlic, Brunoise Jalapeno and Minced Cilantro Stems.
  8. Stir often, Cook on Medium-Low for 10-15minutes until onions are translucent
  9. Once onions are translucent, Add in 32oz Beef Stock (Deglazing)
  10. Stir while scraping the bottom with your Rubber Spatula
  11. Add in 2 TBL Tomato Paste, stir to incorporate.
  12. Add 4 TBL BBQ Rib Rub – Here’s the Deal Spice Co. Stir to incorporate.
  13. Reduce Heat to Low, and Simmer to reduce by Half (15 – 20 minutes)
  14. Once Reduced by Half (15-20 mins) Add Browned Ground Beef into the Stock Pot, stir to coat with Reduced onion, garlic, and beef stock.
  15. Add 1 TBL Kosher Salt, Stir to incorporate.
  16. Cook on Low for 10 mins.
  17. Add in Diced Roma Tomatoes, and Canned Fire Roasted Tomatoes, Cook on Low for 20-30 minutes while flavors Blend, Stirring occasionally.
  18. Add in Diced Green Bell Peppers, and the Rinsed - Drained Kidney Beans
  19. Stir to incorporate, cook low for 10 mins.
  20. Serve and Enjoy!
  21. If you are not serving immediately, pour into a large, short sided container to Cool Quickly
  22. (Optional) While Chili is cooking, Cook Elbow Macaroni in 6 Quart Stock Pot according to package directions, Drain and Cool.


How we Eat our Chili
  1. Warm up Cooked Elbow Macaroni, Place in bottom of Bowl
  2. Warm up Chili, Pour on top of Hot Macaroni
  3. Garnish with Shredded Cheddar Cheese, Seasoned Sour Cream, Cold Smoked Tomatoes, Cilantro leaf, Sliced green onion and Saltines.
  4. Enjoy!
Meter: Easy
Yield: 4 Pounds - (10) 6oz servings
Time: Prep 30 minutes.  Cook time 90 minutes.   


Mise en Place
  • Cutting Board
  • Chef Knife
  • Rubber Glove – for Jalapeno seeds
  • 12 Quart Stock Pot
  • Rubber Spatula
  • Colander
  • Bowl to strain into
  • Measuring Cups (1/4 cup)
  • 6 Quart Stock Pot (pasta)
  • Large – short-sided pan (to Cool)
  • (9) Prep Bowls – for Mise en Place Ingredients


Ingredients - Organic
  • Extra Virgin Olive Oil (4 TBL – Split into two)
  • 3 Pounds – Ground Beef (85/15)
  • (2) Medium sized Yellow Onion – (3 cups Medium Diced)
  • ¼ cup Minced Fresh Garlic
  • 10-15 Cilantro Stems - Minced (Pick Leaves, reserve for Garnish)
  • (1) Jalapeño – Seeds removed.  Brunoise the pepper (Super small Dice – ¼ cup)
  • 32 oz Beef Stock
  • (2) TBL Tomato Paste
  • (4) TBL – Here’s the Deal Spice Co. BBQ Rib Rub
  • (7) each Roma Tomatoes (Medium Dice)
  • (1) 28 oz Fire Roasted Canned Tomatoes Diced
  • (2) Green Bell Peppers – Seeds Removed – Small Diced
  • (2) 15oz - Canned Kidney Beans – Drained and Rinsed
  • (1-1 ½)TBL Kosher Salt
  • (1) pound Large Elbow Macaroni – Cooked/ Drained/ Cooled (Optional)


Garnish
  • Green onion – Sliced Thin
  • Sharp Cheddar Cheese – Shredded
  • Cilantro – Leaves Picked
  • Cold Smoked Tomatoes
  • Seasoned Sour Cream - (1 cup Sour Cream: 2TBL -HTD- BBQ Rib Rub)
  • Saltines

0 Comments

127 Blend® - Holiday Turkey

11/18/2021

 
Picture
Meter: Moderate
Yield: 1 Turkey - 12-16 Pounds – 8 to 12 servings
Time:   32-38 hours
  • 16 hours to Brine
  • 12 hours to rest
  • 2 hours to prep
  • 4-6 hours to cook

​
Mise en Place (For Brine)
  • Cutting Board
  • 3 gallon stock pot
  • Chef knife
  • Vegetable peeler
  • 1 cup measuring vessel
  • 1/3 cup measuring vessel
  • Rubber spatula
  • Thermometer


Mise en Place (For Turkey)
  • 24-30 inches of Kitchen Twine
  • Roasting Rack – we use a V-shaped roasting rack
  • Roasting pan – Lined with Foil
  • Aluminum Foil – To cover turkey
  • Kitchen Sheers
  • Bowl – for Butter (room temp)
  • Tablespoon
  • Rubber Spatula
  • Vinyl Gloves
  • Thermometer
Ingredients for Brine (3 Gallons)
  • 1.5 gallons cold Water
  • 12 Pounds – Ice (reserve until the end)
  • 2 Cups Kosher Salt (Morton)
  • 1.5 cup Honey
  • 3 Lemons
    • Peel the Zest
    • Cut in half for Juicing
  • 1 Bottle 127 Blend® (with 2 Tablespoons removed – for Butter)
  • 1 cup Carrot – Peeled, Rough Chop
  • 1 cup Celery – Rough Chop
  • 2 cup Yellow Onion – Peeled, Rough Chop


Ingredients for Turkey
  • 12-16 pound Turkey (with Legs)
  • 1 Pound - Unsalted Butter (Room Temperature)
  • 2 Tablespoons – Here’s the Deal Spice Co.® 127 Blend®
  • 1 Packet of Poultry fresh herbs (rosemary, thyme, sage)


Picture
Picture
Picture
Picture
Recipe for the Brine
  1. Clean and Rough Cut the Yellow Onion, Carrot, and Celery.
  2. Peel the Zest from the Lemons
  3. Cut lemons in half – Reserve
  4. Measure out 1.5 cups Honey
  5. Measure out 2 Cups Kosher Salt
  6. Fill Stock Pot with 1.5 Gallons Cold Water
  7. Place Stock pot on stove, over High Heat
  8. Add in the Carrot, Celery, Onion, Lemon Zest
  9. Squeeze the juice of the half-cut lemons into water.
  10. Add the cut lemon rinds.
  11. Using a Rubber Spatula – add in Honey.
  12. Open the jar of 127 Blend® and remove 2 Tablespoons (to be used in buttering turkey)
  13. Add remaining contents of the jar of 127 Blend® into the stock pot of water
  14. Bring to a rolling Boil, Boil for 5 minutes while stirring to dissolve the salt along with incorporating the ingredients.
  15. Once boiled for 5 minutes, remove from heat, give it a few good stirs (to release as much heat as possible)
  16. Add in the 12 Pounds of Ice, Stir to melt.
    1. In this technique we are making a concentrated brine (1.5 gallons) and adding 12 pounds of Ice will equal the correct amount of Brine – 3 gallons.
    2. On Average (1) gallon of water weighs 8 pounds
    3. 1.5 gallons of water equals 12 pounds.
    4. While using this method, you may use the brine in a few hours once completely Chilled.
  17. Make sure the Brine is Cold before using!  Safe temperature for brining the turkey is 33-40°F.  Use your thermometer to test the temperature.
  18. Place Thawed Turkey in Cold Brine - (Remove the inner Bags or items hiding in turkey)
    1. You can Brine in the Pot if big enough or in a Plastic container.
  19. Use a Plate or a bag of ice to weigh down the turkey in the brine
  20. Place the container with the Turkey and Brine in your refrigerator for 16-20 hours.
  21. If Using a Brine-bag, place in the sink before transferring the turkey and brine
    1. (This tends to fall over which creates a mess)
  22. When using the Brine-bag, when placing in the refrigerator, place inside of a large container with sides. (This helps from tipping over along with keeping the brined turkey upright, for full absorption)
  23. Brine 12-16 pound turkey for 16-20 hours
  24. *Keep in mind that the turkey needs to rest after its been brined for 8-12 hours
Picture
Removing Turkey From Brine:
  1. Place brine bag in a clean sink.
  2. Pull turkey out of bag (or container) allow to drip free from the brine.
  3. In the other half of the sink, run cold water over and through the turkey.
    1. This rinses off the extra salt content from the skin and cavity.
  4. Rinse well. Allow to drain. Pat dry.
  5. Place Turkey in the roasting rack that it will be cooked on, with the roasting pan under.
  6. Place turkey in the appropriate container to rest uncovered for 8 -12 hours in refrigerator.
    1. Resting allows the Brine to absorb evenly throughout the entire bird.
      ​
Recipe for Buttering Under Turkey Skin
  1. Once the turkey has rested in the refrigerator for 8-12 hours and the extra water content has released from the bird, and before you Truss it, we will Butter it!
  2. Place the (1) Pound room Temperature butter in a bowl.
  3. Use the 2 TBL of Here’s the Deal Spice Co.® - 127 Blend® that was Measured out earlier.
  4. Mix well to incorporate the 127 Blend® into the butter. 
  5. With gloves on, slide your fingers under the breast skin between the skin and the breast meat.
  6. Use your fingers to apply 127 Blend® Butter under the skin evenly
  7. Reserve the Extra 127 Blend® Butter for later
Picture
Picture
Picture
Picture
Picture
Picture
Picture
Picture
Picture
Instructions for Trussing your Turkey after it has been buttered under the skin.
Trussing the turkey helps ensure that it will cook evenly

  1. Set up a cutting board with a damp paper towel underneath to keep from slipping.
  2. Cut your twine to 24-30 inches.
  3. Place your Turkey Breast side down on the cutting board.
  4. Find the middle of your twine
  5. Secure it around the neck of Turkey, make sure it is centered and each piece of twine is the same length at the ends.
  6. Allow the twine to follow the backbone, until the Legs – the twine should drop below and under each Leg. (Pictures)
  7. Flip Turkey to breast side up (see Pictures)
  8. The Twine needs to go around the back side of the thighs up and around to the leg bones.
  9. Use the twine to pull the leg/feet bones to come together
  10. Use a “Surgeon’s knot” to gather the legs together.
    1. (Like tying your shoes, but with an extra loop and through)
  11. Tie semi tight – we will need to have some extra length in the tie, for the next step of tucking the wings in
  12. Tie the knot again, to secure the knot.
  13. Locate the Twine that lays behind the wing, stretch it and tuck the wing elbow behind it inside of the twine
  14. Do this to the other side as well (See Pictures)
  15. Drain any extra juices that were released from the turkey from the roasting pan.
  16. Apply foil to the roasting pan, this will help with easy clean up
  17. Place the roasting rack on top of foil
  18. Place turkey breast side up in the V shaped roasting pan
Buttering the Outside of the Turkey
  1. Once the turkey is trussed use the remaining 127 Blend® butter and apply to the breast and thigh skin, while using gloves.
  2. Coat the outside of the turkey with 127 Blend® Butter
  3. Place the (1) packet of Poultry fresh herbs inside of cavity of the turkey.
  4. Cool Buttered Bird for 1-2 Hours Before Cooking in refrigerator.
(Pictures)
Picture
Picture
Cooking the Holiday Turkey
Approximate time for cooking 12-16 pound turkey is 20 minutes per pound at 325°F (Roughly 3-4 hours)
  1. Pre heat oven to 325°F
  2. We will cook the turkey low and slow, turning the pan every 45 mins
  3. Once oven is preheated
  4. Place Turkey in the Oven
  5. Set Timer for 45 minutes
  6. Rotate Turkey Pan every 45 minutes
  7. If Browning too Quickly – Cover the Turkey with Aluminum Foil
  8. Continue to cook and rotate until internal temperature reaches 155°F
    1. Checking Temperature – check in multiple areas of the Turkey – Breast meat, Thigh Meat and Leg area nearest to the Bird
    2. Repeat these multiple area temperature checks when turkey is closer to being done
    3. The Finished Temperature for the Turkey (all Poultry) is 165°F
  9. Once Turkey reaches 155°F – Remove the Foil
  10. Continue to cook until internal temperature reaches 165°F (check multiple areas)
  11. Once Turkey has reach 165°F remove from oven
  12. Allow the Turkey to Rest for 15-20 mins with foil on top before Slicing and Serving


Togarashi – Rice Paper Spring Roll

4/6/2021

 
Picture
Meter: Easy
Yield: 5 Spring Rolls
Time: 40 Minutes
Allergens: Sesame

Vegetable Marinade
Yield:
1/3 Cup
Time: 10 minutes

Mise en Place
  • Chef Knife
  • Cutting Board
  • Shallow Bowl
  • Spoon
  • Measuring Spoons
  • Measuring Cups
  • Zester/ Micro Plane

Ingredients
  • 1 ½  TBL - Togarashi – Here’s the Deal Spice Co.
  • 3 TBL Soy Sauce
  • 1/3 cup Sesame Oil
  • 1 TBL Mirin (Sweet Rice Wine)
  • ½ tsp Sriracha
  • 1 Lime (Zest)
  • ½ Lime (Juice)
  • 1 TBL Mint (~ 2 Leaves)
  • 1 tsp Cilantro leaves (~ 5 sprigs)
  • 1 piece Jalapeño (1” x 1”)
​Directions
  1. In a Shallow Bowl, Measure Out Liquid ingredients: 3 Tablespoons Soy Sauce, 1/3 cup Sesame oil, 1 Tablespoon Mirin, ½ tsp Siracha.
  2. Zest 1 whole lime into the bowl, Cut and juice half of the Lime. Add Lime Juice to Bowl. Wedge the other Half for garnish.
  3. Add in 1 ½ Tablespoon Togarashi – Here’s the Deal Spice Co.
  4. On the cutting Board, Pick 2 large Mint Leaves, Lay them on top of each other and thinly slice into Threads (Chiffonade) Place into the bowl with other ingredients
  5. Remove the Cilantro Leaves from the Stems, lay out on cutting board and Chiffonade, add to the bowl of other ingredients.
  6. Wipe off Cutting Board with a damp paper towel.
  7. Slice Jalapeno in half (the long way) Use Spoon to remove the seeds. Cut Jalapeno into a 1” x 1” Piece.
  8. Cut Jalapeno into Brunoise  (1/16” x 1/16” x 1/16”) Very Small Dice. Add to bowl of ingredients.
  9. Stir to combine. Allow to sit for 10 Minutes before Use.

Picture

Directions – Shiitake Mushroom Roast
  1. Pre Heat Oven 350F 
  2. Remove Stems from Shiitake mushrooms, discard. 
  3. Place Shiitake Caps on a cookie tray, Drizzle with Sesame oil and a Splash of Soy Sauce.
  4. Bake in 350F Oven for 10-15 Minutes. Remove and Cool.
  5. Once Cool, Slice into Thin Strips and reserve in a separate small bowl


Directions – Vegetables 

Julienne - Cutting an Item into thin uniformed strips – Match Stick in size – ¼“ wide x ¼” thick x 2 ½ “ long

Vegetable Deveining – to remove tough fibers from end of sugar snap down the vein of the inside curve of the vegetable.  Simply, snap the tip then pull downward towards inner curve to remove tough fiber.
  1. On a clean Prep area, have your Vegetables that you are preparing near your station.
  2. When Prepping the Vegetables, Cut each one into similar sized pieces- we recommend “Julienne Cut” (Definition above)
  3. Designate 1 bowl per Vegetable – finished product
  4. Remove Butter Lettuce from package, rinse in cold water, tear out the rib or remove it using a sharp knife and place the leaves in its own small bowl.
  5. Red and Yellow Bell Peppers, Cut in Half, remove the seeds, cut into smaller sized pieces, and cut into Julienne – Keep Separate and place each pepper into its own Bowl.
  6. Cut a 2 inch by 2 inch piece of Red Cabbage, Place flat side down and Slice into Julienne, place into its own bowl.
  7. Remove Sugar snaps from water bowl, Use the “Vegetable Deveining” method to remove the Tough-Fibrous piece from the inside of the pod. 
  8. Slice Sugar Snap on a Bias, Julienne. Place into its own bowl.
  9. Peel your Carrot, cut down into smaller more manageable pieces, Carefully slice into thin strips.  – you may use a Mandoline slicer for this preparation – Please use caution when using this appliance
  10. Place carrots into its own bowl.
  11. Cucumbers, Cut into 2 ½” Pieces, slice in half, remove the seeds with a spoon.  Thinly Slice strips (Julienne). Place into its own bowl 
  12. Clean off Cutting board, organize your station.
  13. Fill a 12 inch diameter bowl with cold water
  14. Place 1 Rice Paper Wrapper in the water to soften (about 3 minutes)
  15. In your Medium Size bowl, place a small handful of each Julienned Vegetable inside.  
  16. With a Large Spoon, stir your Marinade – Spoon just enough Marinade on top of your Vegetables to lightly coat them.  (too much marinade will over-hydrate the wrapper and cause it to tear)
  17. Toss to evenly coat the vegetables – It should look like a vibrant rainbow of color.
  18. Check the Spring Roll Wrapper it should be fully hydrated with out any tears or hard areas.
  19. Gently remove the Wrapper with 2 hands, grabbing just the edge of it, and hold over bowl of water to allow excess of water to drip back into the bowl. 
  20. Once removed from water, add in a new Spring Roll Wrapper, to hydrate while you prepare the Spring Roll. 
  21. You do not want to have a wet station while rolling these up.  
  22. Gently Place Rice paper on your cutting board, straighten out to have it flat and circular. If wrapper is extremely wet, allow it to dry on the cutting board until the excess water has evaporated
  23. In the middle of the rice paper, Place Butter Lettuce down first, Green side down. This will act as a barrier between the tossed vegetables and the rice paper. It also holds all the Vegetables together.
  24. Toss your Marinated Vegetables again.  Place a small handful of vegetables on top of the butter lettuce.  Just enough to cover the butter lettuce.  
Vegetable Spring Roll
Yield: 8-10 Spring Roll
Time: 30 Minutes

Mise en Place
  • Oven pre heated to 350F
  • Cookie Sheet
  • Chef Knife
  • Cutting Board
  • Scrap Bowl
  • Individual bowls (8ea)
  • Medium Size Bowl, to toss Vegetables and Marinade together
  • Large Bowl Filled with cold water (12 inches in diameter) – to rehydrate Rice paper Wrapper


Ingredients
  • 1 Packet Rice Paper (Spring Roll Wraps)
  • 8 each Shiitake mushrooms – Remove stems
  • 8 leaves Butter Lettuce – Rinsed, Rib Removed
  • ½ each Red Bell Pepper – Julienne
  • ½ each Yellow Bell Pepper – Julienne
  • ½ cup Red Cabbage – Julienne
  • 15 each Sugar Snap Peas – Julienne
  • 1 Carrot – Peeled – Julienne
  • ¼ Cucumber – Removed seeds, Peel if preferred – Julienne
Picture
Picture
Picture
The Fold-Roll-Up

  • Grab the edge of the rice paper closest to you, stretch and fold over the Vegetables and butter lettuce. Tuck under the butter lettuce if possible.
  • Fold in your Left and Right Side of the Rice paper, Stretch it and make it tight around the vegetables.
  • Roll it up.
  • Place Fold side up to air dry
  • Continue the process, making more Spring rolls with the marinated vegetables.
  • Once Semi Dry, Use a Sharp Knife to Cut in half, Place on a serving platter. Enjoy

Pairs best with Here’s the Deal Spice Co. – Wing Blend - Spicy Peanut Sauce!!


Tips and Tricks
  • Having a Scrap bowl near your station is an easy way to place small amounts of garbage in, while prepping.  This keeps you on your cutting board prepping for a longer period of time.
  • Sugar Snap Peas – wash and reserve Sugar Snaps in a bowl filled with cold water in the refrigerator. This will allow the Peas to stay Crisp, Crunchy and Hydrated.  When cooking with Sugar Snaps, use the “Vegetable Deveining” Method to remove the inside Tough, Fibrous piece from the Sugar Snap Pea Pod. (see Glossary)
  • Keep your Vegetables in separate bowls:
    • If there is a dietary restriction when building spring rolls – it’s easy to omit
    • This allows you to only use what you need at that time, keeping them crisp and crunchy.
    • Only toss enough vegetable and marinade together for the amount of spring rolls needed.

Spicy Peanut Sauce - Wing Blend

4/6/2021

 
Picture
Directions
  1. Measure out all ingredients and add them to the blender. EXCEPT the Sesame Oil.
  2. Blend on High until combined and smooth. (1 minute)
  3. While Blender is running drizzle in 1 TBL Sesame oil.
  4. Blend until incorporated (30 Seconds)
  5. Use Rubber Spatula to transfer to a dipping bowl.
  6. Eat and Enjoy

​Pairs Best with our Togarashi Rice Paper Spring Rolls!!!
Meter: Easy
Yield: 1 Cup
Time: 7-10 Minutes
​Allergen: Sesame

Mise en place

  • Blender
  • Cutting Board
  • Chef Knife
  • Measuring Spoons
  • Measuring Cups
  • Rubber Spatula


Ingredients
  • ½ cup Smooth Peanut Butter
  • ¼ cup Soy Sauce
  • 1 TBL Rice Vinegar
  • ½ TBL Garlic Clove, Rough Chop
  • ¼ cup Water
  • 1 TBL Pickled Ginger Juice
  • ¼ TBL Sriracha
  • 2 TBL – Wing Blend - Here’s the Deal Spice Co.
  • 1TBL Sesame Oil
Picture

Wing Blend Pineapple Salsa

3/11/2021

0 Comments

 
Picture
Meter: Easy
Time: 30-40 minutes
Allergens: Sesame 

Mise en Place
  • Chef Knife
  • Cutting Board
  • Oven Pre-heated at 400°F
  • Bowl
  • Rubber Spatula
  • Bench Scraper
  • Cookie Sheet
Ingredients
  • 2 TBL Wing Blend – Here’s the Deal Spice Co.
  • ½ Golden Delicious Pineapple
  • 1 each Poblano Pepper
  • ¼ Red onion
  • ½ Red Bell Pepper
  • 1/2 Jalapeño Seeded 
  • 1 each Lime (Juice and Zest)
  • 5 Mint Leaves
  • 2 TBL Cilantro leaf
  • 1 tsp Oil (Sesame or Olive Oil)
Directions
  1. ​Remove Skin from Pineapple, cut into quarters, remove Core.
  2. Sprinkle 1 TBL Wing Blend on 2 of the quarters of Pineapple, Place on a cookie tray and place into a 400F Oven for 20 mins. Once the timer has expired remove pineapple to cool.
  3. Place Poblano on a cookie tray and place in the oven. Roast for 20 minutes. Once 20 minutes has expired, remove Poblano pepper and place into a plastic bag – this will sweat the pepper and make it easy to remove the skin of the pepper.
  4. The Poblano and the Pineapple can go on the same Cookie sheet and in the oven at the same time.
  5. While the Pineapple and Poblano are cooking/ cooling
  6. Small dice (¼) Red onion, place in a non-reactive bowl
  7. Cut the Red Bell Pepper and remove the seeds, Small Dice (½) the pepper, place in the same bowl with the red onion.
  8. Cut the Jalapeno in half, use Gloves or a spoon to remove the seeds, Mince Half of the Jalapeno and place it in the Bowl with the onion and bell pepper.
  9. Zest the outer green part of the Lime, over the bowl of the other ingredients.
  10. Place Zested Lime on cutting board, cut in half and juice (½) into the bowl of prepped ingredients.
  11. Wedge the other half of the lime for garnish – set aside and reserve.
  12. Pick and place Mint leaves (5 ea) on your clean cutting board, stack them on top of each other, Slice Mint leaves into thin strips (Chiffonade).  Place into Bowl with other ingredients.
  13. Pick and place Cilantro leaves on your clean cutting board, stack as best you can, Slice Cilantro into thin strips (Chiffonade). Measure out 2 TBL. Place into Bowl with the other ingredients.
  14. Add 1 tsp of your choice of Oil (Sesame oil or Olive oil) – Sesame oil will give it a toasted, nutty flavor. Olive oil will give it a neutral flavor.
  15. With a Rubber Spatula mix well to combine Flavors.
  16. Wipe off your Cutting board, Place Cooled Pineapple on cutting board, Slice into long Strips, roughly Quarter inch, Place the strips on their sides, slice again at Quarter inch, turn the strips on their sides (horizontal) and continue the Quarter inch cut to Dice Pineapple into (¼” x ¼” x ¼”) Medium Dice.
  17. Place into Bowl with other ingredients
  18. Add the remaining 1 TBL of Wing Blend – Here’s the Deal Spice Co.
  19. Mix to incorporate.
  20. Clean off your Cutting board.
  21. Remove Poblano from the plastic bag, place on cutting board and remove the stem part, slice in half the long way, open the pepper and clean out the seeds.
  22. Place the Steamed pepper, seed side down – Scrape off the Skin and discard.
  23. Lay out the skinned and seeded pepper and Small Dice.  Slice into thin strips, turn horizonal and continue to slice the strips into a small dice.
  24. Place Poblano pepper into the bowl with the other ingredients, with rubber spatula mix well to incorporate.
  25. Allow to sit for 10 mins for flavors to incorporate.
  26. Stir before serving.

​We used this Salsa to complement our Seared Ahi Tuna. It is light and refreshing salsa for lunches or dinners. Also, can be used for Chips and Dip or a side dish for your picnics.
Picture
Tips and Tricks
  • Reactive Bowls are anything aluminum or cast iron.
  • Non-reactive bowls are made from Ceramic, Stainless Steel or Glass.
  • Clean the cutting board in between each vegetable when prepping – use a wet/ damp paper towel and a bench scrapper. This will help with a clean prep area, help your cuts be more accurate and makes for easy clean up.
Picture
Glossary
​Bench Scraper: A baker’s essential tool, it has a plastic handle with a square flat metal blade-like area that is used to scrape up excess flour. However, it can also be used to transport prepped items, such as: Small diced Vegetables and Fruits from a cutting board. These also come in plastic without a handle and are more flexible for scraping bowls or cutting boards.
Picture
0 Comments

Beurre Blanc (White Butter Sauce)

3/6/2021

 
Picture
Mise en Place
  • Cutting Board
  • Chef Knife
  • 2 Qt saucepan
  • Whisk
  • Fine Mesh Strainer
  • Bowl to strain into
  • Small Ladle or Spoon
  • Measuring Cup (1 cup)
Picture
Finishing Flavors
  • 1-2 Tablespoon - Your Choice – Here’s the Deal Spice Co.’s – 127 Blend, Togarashi, BBQ Rib Rub, Wing Blend
    • 127 Blend would be Best for Steaks, Broccolini, Baked Potato
    • Togarashi would be Best for Fish, Shrimp, Oysters
    • BBQ Rib Rub would be Best for Shrimp, Southern Style Pasta, Grits
    • Wing Blend would be Best for Calamari,  Octopus, Chicken
Picture
Picture
Picture
Tips & Tricks
  1. This is an Emulsified Butter Sauce – Too Hot it will separate – Too Cold it will Separate.
  2. We use Heavy Cream to help create the Emulsification process. (Trade Secret – Stabilizer)
  3. We use Chardonnay due to its buttery flavors and notes.
  4. Whisking / Stirring with the whisk – you want to keep the warm cream moving while adding your cold butter, if for any reason it sits, without movement, the butter will melt unevenly and separate… and you must start over!​
Picture
Meter: Medium
Yield: 1 Cup
Time: Prep 5 minutes.  Cook time 20 minutes. Finish time 10 mins
Picture
Ingredients
  • 1 Shallot
  • 1 Tablespoon Black Peppercorn
  • 1 Sprig of Fresh Thyme
  • 1 Bay Leaf
  • 1 Cup White Wine (Chardonnay)
  • 1 Fluid Ounce Heavy Whipping Cream
  • 2 Sticks Butter (Unsalted) Cold
Picture
Directions
  1. Take butter out of paper, with a sharp knife cut into small squares.  Place on a small plate, Refrigerate until needed – It is KEY to have your butter as Cold as Possible (but not Frozen)
  2. Clean your Shallot, cut off both ends, cut in half and peel off the outer skin.
  3. Slice the shallot ¼ inch thick (it does not need to be uniform; we will be straining this out
  4. Place sliced shallot into the 2Qt Pot.
  5. Add in 1 Tablespoon Black Peppercorns, Thyme Sprig (whole), Bay leaf into the 2 Qt pot.
  6. Measure out 1 Cup White wine, pour into the 2Qt Pot with the other ingredients.
  7. Turn on Burner to Medium Heat – Place 2Qt Pot on top.
  8. Reduce white wine until “Au Sec” which means: Almost Dry (20-30 mins) do not burn.
  9. About 1 oz remaining – tip the pan backwards to gauge how much is left.
  10. Add in 1 oz of Heavy Whipping Cream – Place back on burner, lower heat to LOW
  11. Reduce heavy cream, by half.
  12. Pull Sauce Pot off heat (keep burner on low) whisk the cream, wine, shallot, peppercorn mixture to incorporate.
  13. Pull Butter from Refrigerator.
  14. This is where the butter sauce could “Break” The cream can not be Simmering but it still has to be warm enough to melt the butter – slowly – to create the emulsification
  15. While Whisking the Heavy Cream sauce, add in a few butter squares at a time.
  16. Continue to Whisk, always, until all the butter is emulsified into the heavy cream sauce.
  17. If the sauce begins to cool too much due to the cold butter, Move the pan halfway onto the Low Burner, continuing to Whisk. – Pull off heat if Mixture gets too hot.
  18. Keep adding Butter little by little, keep stirring until all butter is incorporated and emulsified.
  19. Once All the butter is added, whisked in, and emulsified, remove from heat stir for another minute.
  20. Strain through a fine mesh strainer, into a bowl or smaller sauce pan.
  21. This is your classic Beurre Blanc
  22. You can Add just about anything to this butter sauce, Fresh Herbs are the most common.
  23. We add in our Spice Blends to create a memorable butter sauce with unique flavor profiles.
  24. Add in your Favorite Here’s the Deal Spice Co.’s seasoning blend, allow the flavors to steep in the butter sauce for 30mins before use.
  25. Keep this sauce warm – roughly 120F.
  26. You can use a water bath for the holding of the finished sauce.  Use a pot where your finished sauce bowl or vessel will fit into, with our falling in or hanging over the sides.
  27. Fill the Pot with water that is 100-120 degrees, then place your Beurre Blanc bowl on top.
  28. Whisk often so a skin does not form.
Picture
Picture

Organic Creamy Vinaigrette Salad Dressing

3/5/2021

 
Picture
Meter: Easy
Yield: 1 Cup
Time: 5 minutes Prep – 1 Hour wait

​Mise en Place
  • Large Bowl
  • Measuring Cups
  • Measuring Spoons
  • Rubber Spatula
  • Whisk
  • Container with a Lid

Ingredients
  • ½ Cup Organic Buttermilk
  • ½ Cup Organic Mayonnaise
  • 1 ½ Tablespoon Organic Red Wine Vinegar
  • 1 ½ Tablespoon Organic Bloody Mary Rim Seasoning – Here’s the Deal Spice Co.

Directions
  1. In a large Bowl, Mix all ingredients together with a Whisk.
  2. Cover, Label, Date.
  3. Place in refrigerator - allow to sit for a minimum of 1 hour before serving.

“The Ultimate” Organic Dipping Sauce

3/4/2021

0 Comments

 
Picture
Meter: Easy
Yield: 1 Cup
Time: 5 minutes Prep – 1 Hour wait

​Mise en Place
  • Large Bowl
  • Measuring Cups
  • Measuring Spoons
  • Rubber Spatula
  • Whisk
  • Container with a Lid

Ingredients
  • ½ Cup Organic Buttermilk
  • ½ Cup Organic Mayonnaise
  • 1 ½ Tablespoon Organic Bloody Mary Rim Seasoning – Here’s the Deal Spice Co.

Directions
  1. In a large Bowl, Mix all ingredients together with a Whisk.
  2. Cover, Label, Date.
  3. Place in refrigerator - allow to sit for a minimum of 1 hour before serving.
0 Comments

Wing Blend – Sweet Heat – Bacon

1/21/2021

 
Picture
Meter: Easy
Yield: 10 pieces of Bacon
Time: 25-40 Minutes
Allergens: Sesame

Mise en Place
  • Oven Pre Heated at 350°F
  • Your Favorite Bacon
  • Cookie Tray (with sides)
  • Parchment paper

​Ingredients
  • 1 oz - Wing Blend - Here’s the Deal Spice Co.
  • 10 pieces - Your Favorite Bacon
Recipe
  1. Pre Heat Oven to 350°F
  2. Line Cookie Sheet with Parchment paper
  3. Lay out Bacon on top of the Parchment, even layer without over lapping.
  4. Heavily sprinkle the Wing Blend – Here’s the Deal Spice Co. over the top of the Bacon.
  5. Allow to Sit for 5 Minutes – Until the Wing Blend turns dark in color.
  6. Bake at 350° F for 15 Minutes.
  7. Check and Rotate Pan
  8. Keep Baking until it is to your preference of Doneness. (10-20 Minutes longer)
  9. Remove from Oven.
    1. be careful of the bacon fat pooling on the bottom.
  10. Drain off the bacon fat and reserve if you prefer for future cooking!
  11. Serve any way you want!!
The Sugar content of the Wing Blend will create a Caramel coating, the Saltiness of the bacon shines through right when the Heat kicks in!
Picture

Wing Blend Recipe

1/21/2021

 
Picture
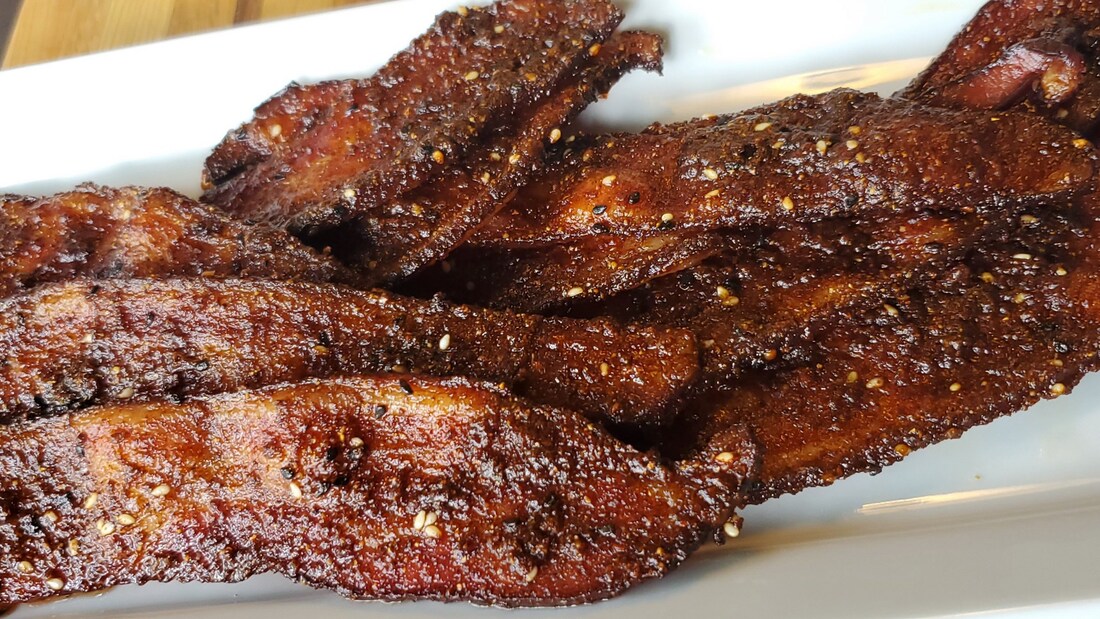
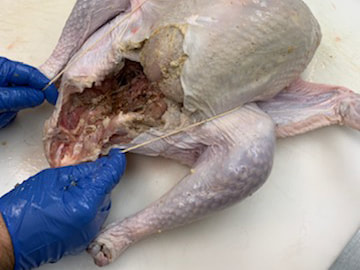
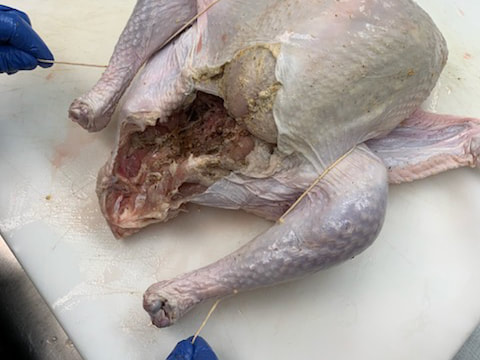
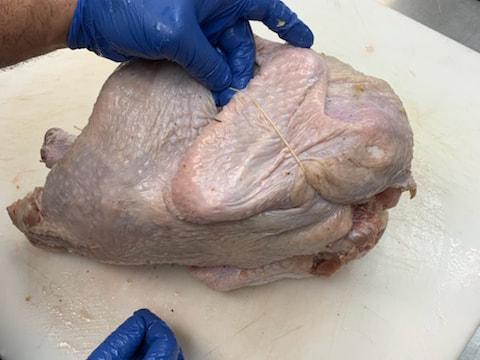
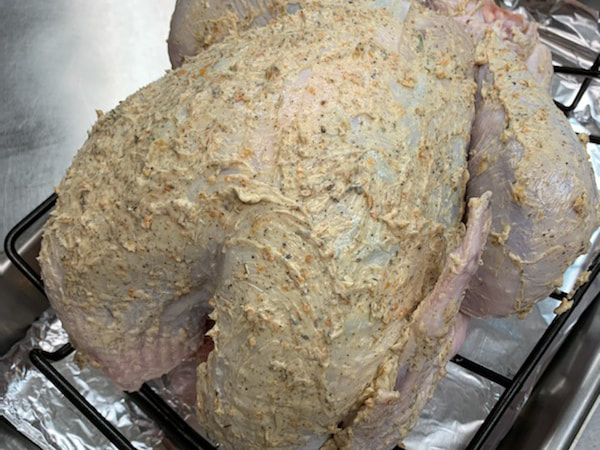
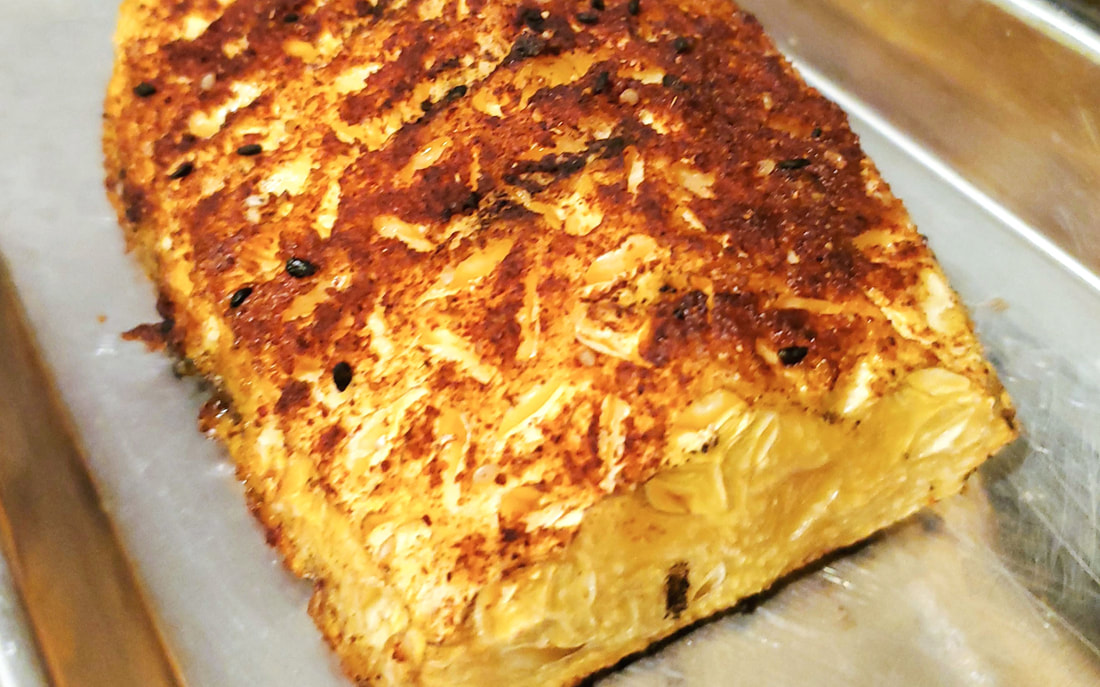
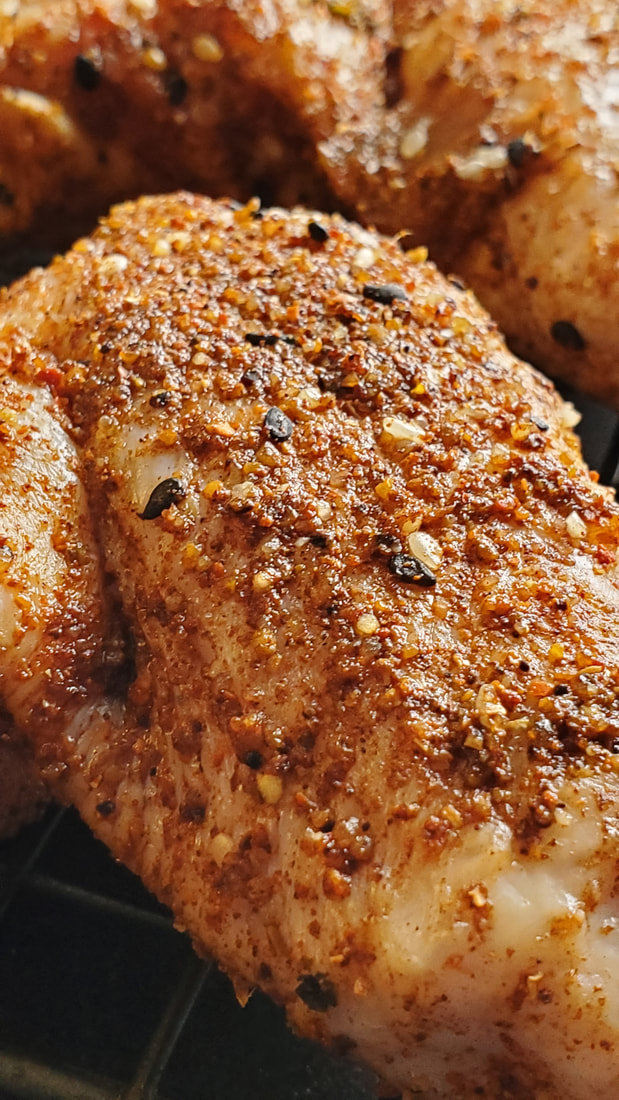
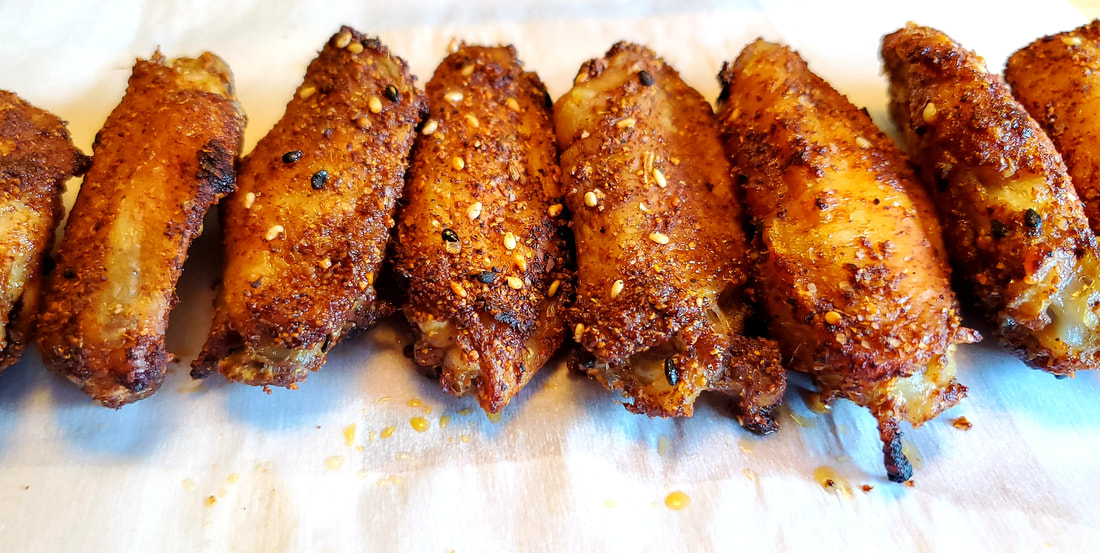
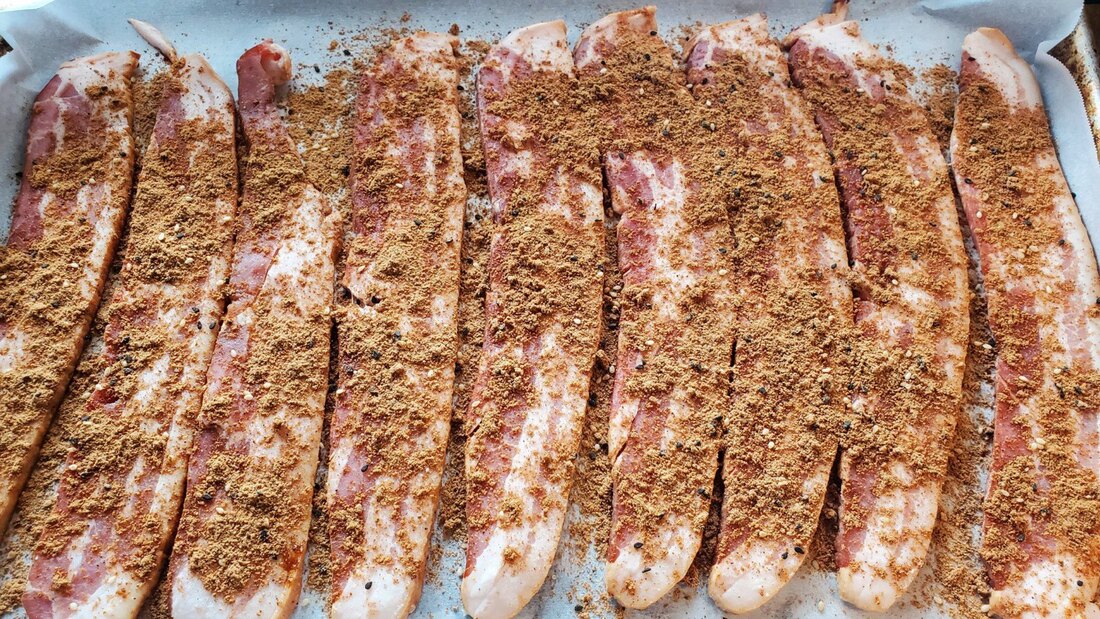
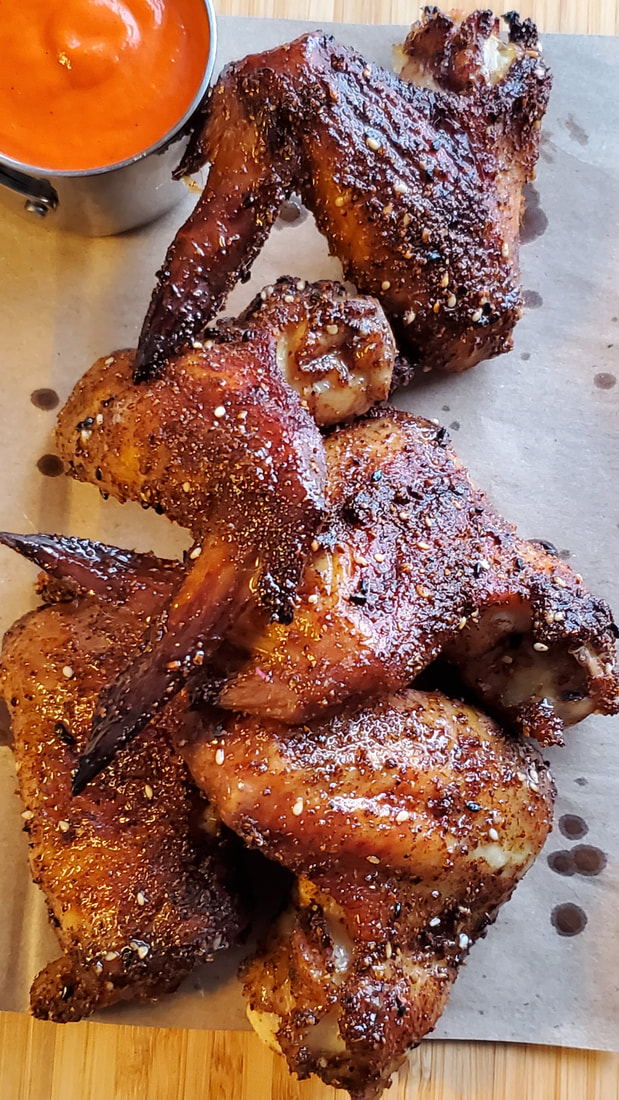
Our Wing Blend has a Sweet & Heat flavor profile along with the savory flavors of Garlic, Onion, Cinnamon, Allspice and Coriander.
Meter: Easy
Yield: 10-12 Chicken Wings
Time: 40-50 Minutes
Allergen: Sesame​

Mise en Place
  • Large Bowl to toss Wing in
  • Cookie Tray (with Sides)
  • Parchment Paper
  • Roasting Rack (also known as a Cooling rack)
  • Pan Spray
  • Tongs

Ingredients
  • 10-12 Chicken wings
  • Kosher Salt
  • Wing Blend - Here’s the Deal Spice Co.
Recipe
  1. Pre Heat Oven to 400° F or light grill and let heat up.
  2. Remove Chicken Wings from package place in a Bowl, Large enough to toss the wings in
  3. Evenly Coat/ Sprinkle Wings with Kosher Salt
  4. Allow to Sit for 7 Minutes
  5. Generously Coat/ Sprinkle Wings with Wing Blend - Here’s the Deals Spice Co.
  6. Allow to Sit for 7 minutes
    1. The Spice Blend will Change in color as it sits.
    2. It will first be a light brown color, after the 7 minutes it will be a dark brown color.
    3. Once the Wing Blend has changed color, now it is Ready to cook.
Picture
Oven Method
  1. Line your Cookie Tray with Parchment paper and place the Roasting rack on top. 
    ​Lightly spray the rack with the pan spray.
  2. Place the Chicken Wings on Rack, without overlapping
  3. Place in 400°F Oven
  4. Cook until Internal Temperature reaches 165°F
    1. (roughly 14 Minutes depending on size of your Wings)
  5. Check Multiple Wings along the thickest parts.
  6. Remove and allow to Cool a bit Before eating.


​Grill Method
  1. Monitor your Heat on your Grill to about 350°F
  2. Place your Wings on the grates Thick side down.
  3. Allow spacing between each wing.
  4. Cook for about 7-10 minutes.
  5. Flip and Cook for an additional 7-10 Minutes.
  6. Move Chicken Wings off the Direct Heat, rear rack on your grill.
  7. If you do not have this as an option, Turn off a Burner and place your Wings over the Off Burner.
    ​This will continue to cook for another 10-15 Minutes.
  8. Cook until Internal Temperature reaches 165°F.
  9. Check Multiple Wings along the thickest parts
  10. Remove, allow to cool a bit Before eating.
Picture
Picture
Tips and Tricks
  • Here’s the Deal Spice Co. – Wing Blend has very little salt, 10% per JAR.
  • The reasoning behind the Salt toss and sit, is to draw out the moisture in the skin of the chicken wings, as the water is pulled out at the same time the salt will dissolve and fill in the pores of the skin – this will allow the salt flavor to penetrate the wing itself, giving the Wings a well-rounded salt seasoning, along with a Crisp and Crunchy Skin.
  • While the Salt has pulled the Moisture from the skin, when adding the Wing Blend and allowing it to sit, the moisture will absorb into the Spice seasoning creating a ‘Crust’ which is key when making Dry Rub Wings. Also, why the seasoning changes color.
  • The Roasting or Cooling Rack used for this recipe is to allow the heat and air circulation to evenly cook the product. You will see this method on many of our recipes, during the preparation, cooking and cooling of products.
  • The Temperature on the Oven method is set to a higher temperature, Due to the In-direct Heat Cooking Method.
  • The Temperature on the Grill method is set to a lower temperature, Due to the Direct Heat Cooking Method.
<<Previous

    Filters

    All
    127 Blend
    BBQ Rib Rub
    Bloody Mary Essential Rim Seasoning
    Togarashi
    Wing Blend

    Archives

    February 2022
    November 2021
    April 2021
    March 2021
    January 2021
    December 2020
    April 2020
    March 2020

    RSS Feed

Picture

Follow Us

Facebook
Instagram
​

Support

FAQs
Shipping

Contact

Email
Plymouth, Minnesota
  • Home
  • Products
  • Recipes
  • Find Us
  • FAQs
  • About