HERE'S THE DEAL SPICE CO.
  • Home
  • Products
  • Recipes
  • Find Us
  • FAQs
  • About

127 Blend® - Holiday Turkey

11/18/2021

 
Picture
Meter: Moderate
Yield: 1 Turkey - 12-16 Pounds – 8 to 12 servings
Time:   32-38 hours
  • 16 hours to Brine
  • 12 hours to rest
  • 2 hours to prep
  • 4-6 hours to cook

​
Mise en Place (For Brine)
  • Cutting Board
  • 3 gallon stock pot
  • Chef knife
  • Vegetable peeler
  • 1 cup measuring vessel
  • 1/3 cup measuring vessel
  • Rubber spatula
  • Thermometer


Mise en Place (For Turkey)
  • 24-30 inches of Kitchen Twine
  • Roasting Rack – we use a V-shaped roasting rack
  • Roasting pan – Lined with Foil
  • Aluminum Foil – To cover turkey
  • Kitchen Sheers
  • Bowl – for Butter (room temp)
  • Tablespoon
  • Rubber Spatula
  • Vinyl Gloves
  • Thermometer
Ingredients for Brine (3 Gallons)
  • 1.5 gallons cold Water
  • 12 Pounds – Ice (reserve until the end)
  • 2 Cups Kosher Salt (Morton)
  • 1.5 cup Honey
  • 3 Lemons
    • Peel the Zest
    • Cut in half for Juicing
  • 1 Bottle 127 Blend® (with 2 Tablespoons removed – for Butter)
  • 1 cup Carrot – Peeled, Rough Chop
  • 1 cup Celery – Rough Chop
  • 2 cup Yellow Onion – Peeled, Rough Chop


Ingredients for Turkey
  • 12-16 pound Turkey (with Legs)
  • 1 Pound - Unsalted Butter (Room Temperature)
  • 2 Tablespoons – Here’s the Deal Spice Co.® 127 Blend®
  • 1 Packet of Poultry fresh herbs (rosemary, thyme, sage)


Picture
Picture
Picture
Picture
Recipe for the Brine
  1. Clean and Rough Cut the Yellow Onion, Carrot, and Celery.
  2. Peel the Zest from the Lemons
  3. Cut lemons in half – Reserve
  4. Measure out 1.5 cups Honey
  5. Measure out 2 Cups Kosher Salt
  6. Fill Stock Pot with 1.5 Gallons Cold Water
  7. Place Stock pot on stove, over High Heat
  8. Add in the Carrot, Celery, Onion, Lemon Zest
  9. Squeeze the juice of the half-cut lemons into water.
  10. Add the cut lemon rinds.
  11. Using a Rubber Spatula – add in Honey.
  12. Open the jar of 127 Blend® and remove 2 Tablespoons (to be used in buttering turkey)
  13. Add remaining contents of the jar of 127 Blend® into the stock pot of water
  14. Bring to a rolling Boil, Boil for 5 minutes while stirring to dissolve the salt along with incorporating the ingredients.
  15. Once boiled for 5 minutes, remove from heat, give it a few good stirs (to release as much heat as possible)
  16. Add in the 12 Pounds of Ice, Stir to melt.
    1. In this technique we are making a concentrated brine (1.5 gallons) and adding 12 pounds of Ice will equal the correct amount of Brine – 3 gallons.
    2. On Average (1) gallon of water weighs 8 pounds
    3. 1.5 gallons of water equals 12 pounds.
    4. While using this method, you may use the brine in a few hours once completely Chilled.
  17. Make sure the Brine is Cold before using!  Safe temperature for brining the turkey is 33-40°F.  Use your thermometer to test the temperature.
  18. Place Thawed Turkey in Cold Brine - (Remove the inner Bags or items hiding in turkey)
    1. You can Brine in the Pot if big enough or in a Plastic container.
  19. Use a Plate or a bag of ice to weigh down the turkey in the brine
  20. Place the container with the Turkey and Brine in your refrigerator for 16-20 hours.
  21. If Using a Brine-bag, place in the sink before transferring the turkey and brine
    1. (This tends to fall over which creates a mess)
  22. When using the Brine-bag, when placing in the refrigerator, place inside of a large container with sides. (This helps from tipping over along with keeping the brined turkey upright, for full absorption)
  23. Brine 12-16 pound turkey for 16-20 hours
  24. *Keep in mind that the turkey needs to rest after its been brined for 8-12 hours
Picture
Removing Turkey From Brine:
  1. Place brine bag in a clean sink.
  2. Pull turkey out of bag (or container) allow to drip free from the brine.
  3. In the other half of the sink, run cold water over and through the turkey.
    1. This rinses off the extra salt content from the skin and cavity.
  4. Rinse well. Allow to drain. Pat dry.
  5. Place Turkey in the roasting rack that it will be cooked on, with the roasting pan under.
  6. Place turkey in the appropriate container to rest uncovered for 8 -12 hours in refrigerator.
    1. Resting allows the Brine to absorb evenly throughout the entire bird.
      ​
Recipe for Buttering Under Turkey Skin
  1. Once the turkey has rested in the refrigerator for 8-12 hours and the extra water content has released from the bird, and before you Truss it, we will Butter it!
  2. Place the (1) Pound room Temperature butter in a bowl.
  3. Use the 2 TBL of Here’s the Deal Spice Co.® - 127 Blend® that was Measured out earlier.
  4. Mix well to incorporate the 127 Blend® into the butter. 
  5. With gloves on, slide your fingers under the breast skin between the skin and the breast meat.
  6. Use your fingers to apply 127 Blend® Butter under the skin evenly
  7. Reserve the Extra 127 Blend® Butter for later
Picture
Picture
Picture
Picture
Picture
Picture
Picture
Picture
Picture
Instructions for Trussing your Turkey after it has been buttered under the skin.
Trussing the turkey helps ensure that it will cook evenly

  1. Set up a cutting board with a damp paper towel underneath to keep from slipping.
  2. Cut your twine to 24-30 inches.
  3. Place your Turkey Breast side down on the cutting board.
  4. Find the middle of your twine
  5. Secure it around the neck of Turkey, make sure it is centered and each piece of twine is the same length at the ends.
  6. Allow the twine to follow the backbone, until the Legs – the twine should drop below and under each Leg. (Pictures)
  7. Flip Turkey to breast side up (see Pictures)
  8. The Twine needs to go around the back side of the thighs up and around to the leg bones.
  9. Use the twine to pull the leg/feet bones to come together
  10. Use a “Surgeon’s knot” to gather the legs together.
    1. (Like tying your shoes, but with an extra loop and through)
  11. Tie semi tight – we will need to have some extra length in the tie, for the next step of tucking the wings in
  12. Tie the knot again, to secure the knot.
  13. Locate the Twine that lays behind the wing, stretch it and tuck the wing elbow behind it inside of the twine
  14. Do this to the other side as well (See Pictures)
  15. Drain any extra juices that were released from the turkey from the roasting pan.
  16. Apply foil to the roasting pan, this will help with easy clean up
  17. Place the roasting rack on top of foil
  18. Place turkey breast side up in the V shaped roasting pan
Buttering the Outside of the Turkey
  1. Once the turkey is trussed use the remaining 127 Blend® butter and apply to the breast and thigh skin, while using gloves.
  2. Coat the outside of the turkey with 127 Blend® Butter
  3. Place the (1) packet of Poultry fresh herbs inside of cavity of the turkey.
  4. Cool Buttered Bird for 1-2 Hours Before Cooking in refrigerator.
(Pictures)
Picture
Picture
Cooking the Holiday Turkey
Approximate time for cooking 12-16 pound turkey is 20 minutes per pound at 325°F (Roughly 3-4 hours)
  1. Pre heat oven to 325°F
  2. We will cook the turkey low and slow, turning the pan every 45 mins
  3. Once oven is preheated
  4. Place Turkey in the Oven
  5. Set Timer for 45 minutes
  6. Rotate Turkey Pan every 45 minutes
  7. If Browning too Quickly – Cover the Turkey with Aluminum Foil
  8. Continue to cook and rotate until internal temperature reaches 155°F
    1. Checking Temperature – check in multiple areas of the Turkey – Breast meat, Thigh Meat and Leg area nearest to the Bird
    2. Repeat these multiple area temperature checks when turkey is closer to being done
    3. The Finished Temperature for the Turkey (all Poultry) is 165°F
  9. Once Turkey reaches 155°F – Remove the Foil
  10. Continue to cook until internal temperature reaches 165°F (check multiple areas)
  11. Once Turkey has reach 165°F remove from oven
  12. Allow the Turkey to Rest for 15-20 mins with foil on top before Slicing and Serving


Beurre Blanc (White Butter Sauce)

3/6/2021

 
Picture
Mise en Place
  • Cutting Board
  • Chef Knife
  • 2 Qt saucepan
  • Whisk
  • Fine Mesh Strainer
  • Bowl to strain into
  • Small Ladle or Spoon
  • Measuring Cup (1 cup)
Picture
Finishing Flavors
  • 1-2 Tablespoon - Your Choice – Here’s the Deal Spice Co.’s – 127 Blend, Togarashi, BBQ Rib Rub, Wing Blend
    • 127 Blend would be Best for Steaks, Broccolini, Baked Potato
    • Togarashi would be Best for Fish, Shrimp, Oysters
    • BBQ Rib Rub would be Best for Shrimp, Southern Style Pasta, Grits
    • Wing Blend would be Best for Calamari,  Octopus, Chicken
Picture
Picture
Picture
Tips & Tricks
  1. This is an Emulsified Butter Sauce – Too Hot it will separate – Too Cold it will Separate.
  2. We use Heavy Cream to help create the Emulsification process. (Trade Secret – Stabilizer)
  3. We use Chardonnay due to its buttery flavors and notes.
  4. Whisking / Stirring with the whisk – you want to keep the warm cream moving while adding your cold butter, if for any reason it sits, without movement, the butter will melt unevenly and separate… and you must start over!​
Picture
Meter: Medium
Yield: 1 Cup
Time: Prep 5 minutes.  Cook time 20 minutes. Finish time 10 mins
Picture
Ingredients
  • 1 Shallot
  • 1 Tablespoon Black Peppercorn
  • 1 Sprig of Fresh Thyme
  • 1 Bay Leaf
  • 1 Cup White Wine (Chardonnay)
  • 1 Fluid Ounce Heavy Whipping Cream
  • 2 Sticks Butter (Unsalted) Cold
Picture
Directions
  1. Take butter out of paper, with a sharp knife cut into small squares.  Place on a small plate, Refrigerate until needed – It is KEY to have your butter as Cold as Possible (but not Frozen)
  2. Clean your Shallot, cut off both ends, cut in half and peel off the outer skin.
  3. Slice the shallot ¼ inch thick (it does not need to be uniform; we will be straining this out
  4. Place sliced shallot into the 2Qt Pot.
  5. Add in 1 Tablespoon Black Peppercorns, Thyme Sprig (whole), Bay leaf into the 2 Qt pot.
  6. Measure out 1 Cup White wine, pour into the 2Qt Pot with the other ingredients.
  7. Turn on Burner to Medium Heat – Place 2Qt Pot on top.
  8. Reduce white wine until “Au Sec” which means: Almost Dry (20-30 mins) do not burn.
  9. About 1 oz remaining – tip the pan backwards to gauge how much is left.
  10. Add in 1 oz of Heavy Whipping Cream – Place back on burner, lower heat to LOW
  11. Reduce heavy cream, by half.
  12. Pull Sauce Pot off heat (keep burner on low) whisk the cream, wine, shallot, peppercorn mixture to incorporate.
  13. Pull Butter from Refrigerator.
  14. This is where the butter sauce could “Break” The cream can not be Simmering but it still has to be warm enough to melt the butter – slowly – to create the emulsification
  15. While Whisking the Heavy Cream sauce, add in a few butter squares at a time.
  16. Continue to Whisk, always, until all the butter is emulsified into the heavy cream sauce.
  17. If the sauce begins to cool too much due to the cold butter, Move the pan halfway onto the Low Burner, continuing to Whisk. – Pull off heat if Mixture gets too hot.
  18. Keep adding Butter little by little, keep stirring until all butter is incorporated and emulsified.
  19. Once All the butter is added, whisked in, and emulsified, remove from heat stir for another minute.
  20. Strain through a fine mesh strainer, into a bowl or smaller sauce pan.
  21. This is your classic Beurre Blanc
  22. You can Add just about anything to this butter sauce, Fresh Herbs are the most common.
  23. We add in our Spice Blends to create a memorable butter sauce with unique flavor profiles.
  24. Add in your Favorite Here’s the Deal Spice Co.’s seasoning blend, allow the flavors to steep in the butter sauce for 30mins before use.
  25. Keep this sauce warm – roughly 120F.
  26. You can use a water bath for the holding of the finished sauce.  Use a pot where your finished sauce bowl or vessel will fit into, with our falling in or hanging over the sides.
  27. Fill the Pot with water that is 100-120 degrees, then place your Beurre Blanc bowl on top.
  28. Whisk often so a skin does not form.
Picture
Picture

127 Blend – Roasted Potatoes

4/16/2020

 
Picture

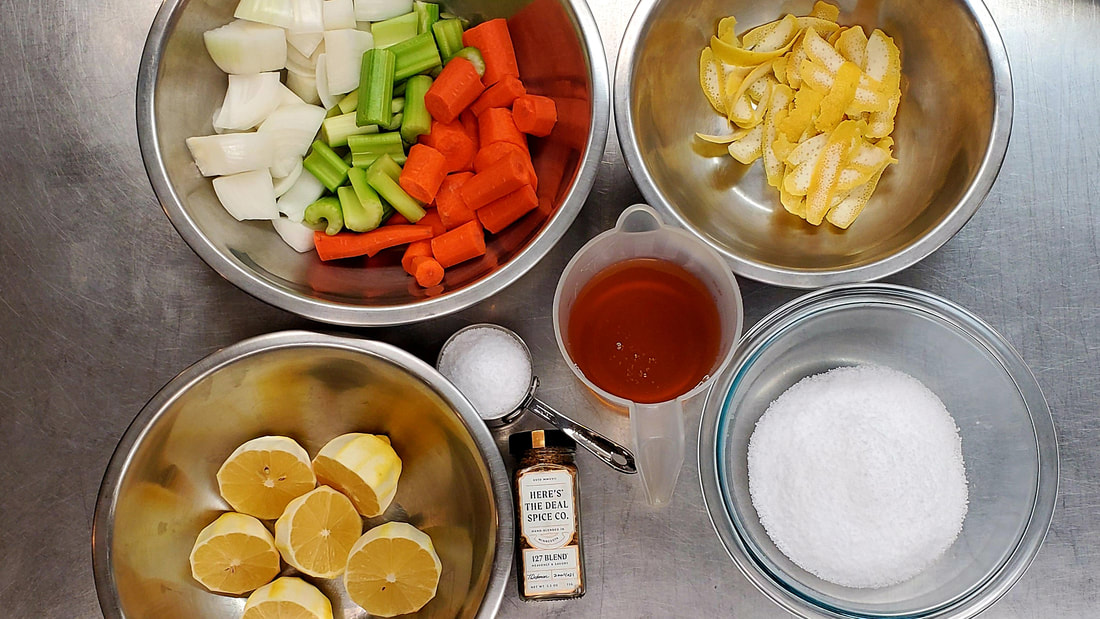
Meter – Easy
Yield – 1 Pound
Time – 2 Hours 
​
​Mise en Place
  • 3 Qt Sauce Pot
  • Colander
  • Cutting Board
  • Knife
  • Roasting Pan
  • Tasting Spoon
​Mise en Place
  • 3 Qt Sauce Pot
  • Colander
  • Cutting Board
  • Knife
  • Roasting Pan
  • Tasting Spoon
Picture
​Ingredients
  • 1 Pound Baby Red Potatoes, Cut in ¼’s
  • 1 oz + 1 TBL 127 Blend- Here’s the Deal Spice Co.
  • 2 each Garlic Clove, peeled, Smashed
  • 1 each Rosemary Sprig
  • 1-2 oz EVOO
  • 4 oz Butter softened 
Recipe
  1. Soften your Butter, on your countertop.
  2. Cut your Potatoes in ¼’s, Place in cold water until all is cut.
  3. Stir the potatoes a few times and pour out the water they were sitting in.
  4. Re-Fill with new, Cold Water. Just enough to cover the amount of Potatoes
  5. Add the 1 TBL 127 Blend- Here’s the Deal Spice Co. to the potato water
  6. Smash the Garlic Cloves, put them in the water with the potatoes, Along with the Rosemary sprig (the whole thing)
  7. Stir water, 127 Blend, garlic, potatoes to incorporate the flavor, use your tasting spoon to taste the water. Adjust the flavors as needed
  • The Garlic clove and rosemary sprig will infuse a light but recognizable flavor to the potatoes as they cook. This is a method of adding levels of flavors to your product.
  • Place Sauce pot over Medium heat, simmer and cook until the Potatoes are fork tender.  a. 30-50 Mins (depending how aggressively you choose to cook theses
  •                       **Please do not over cook until mush. Mush potatoes are not part of Our Recipe
     8. Pre-heat oven to, 400° F with high fan (if possible)
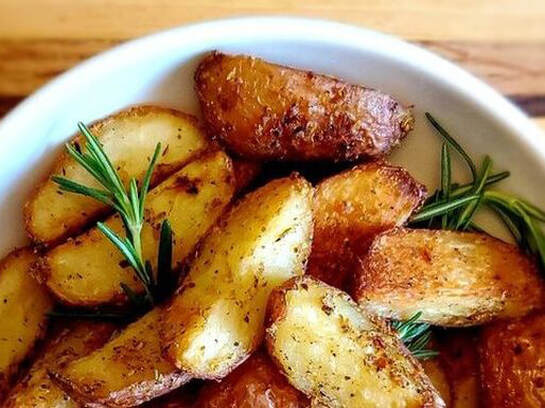
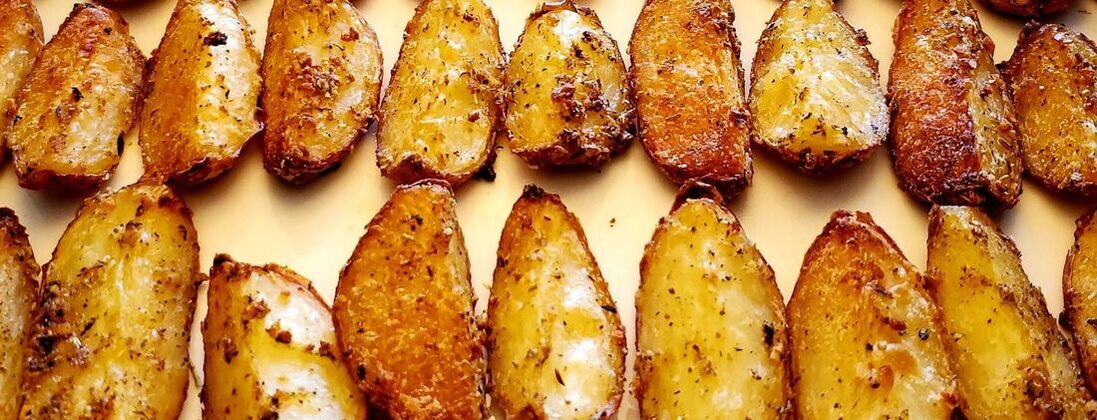
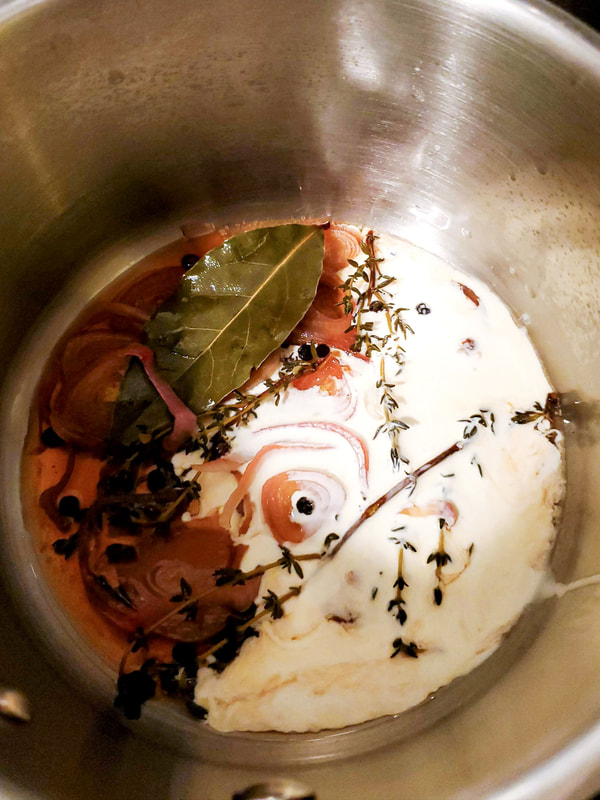
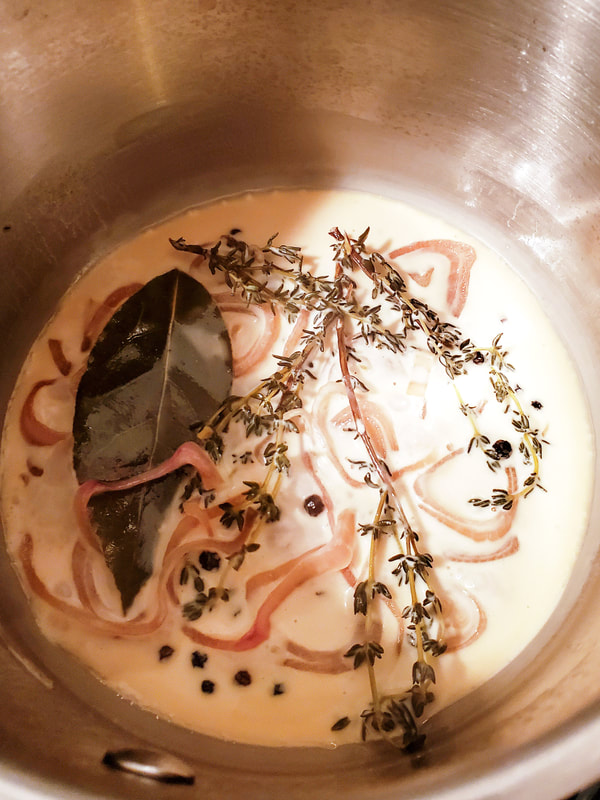
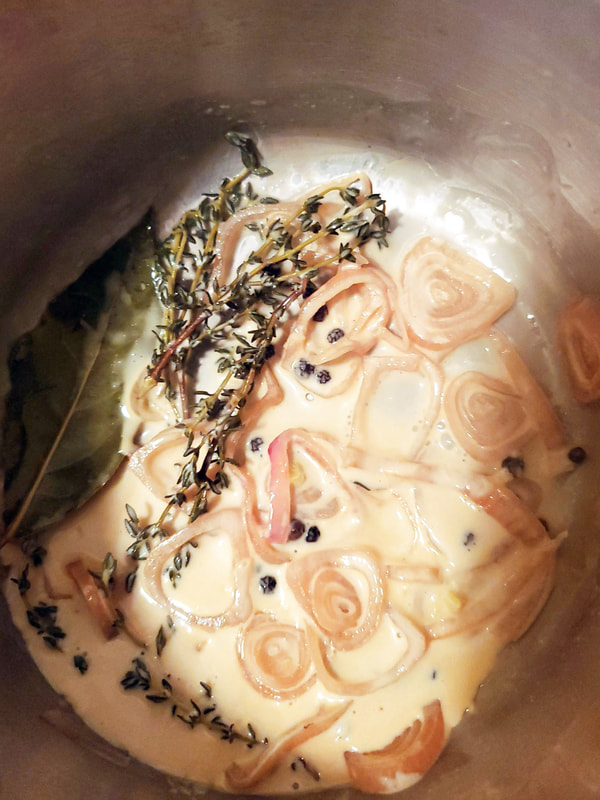
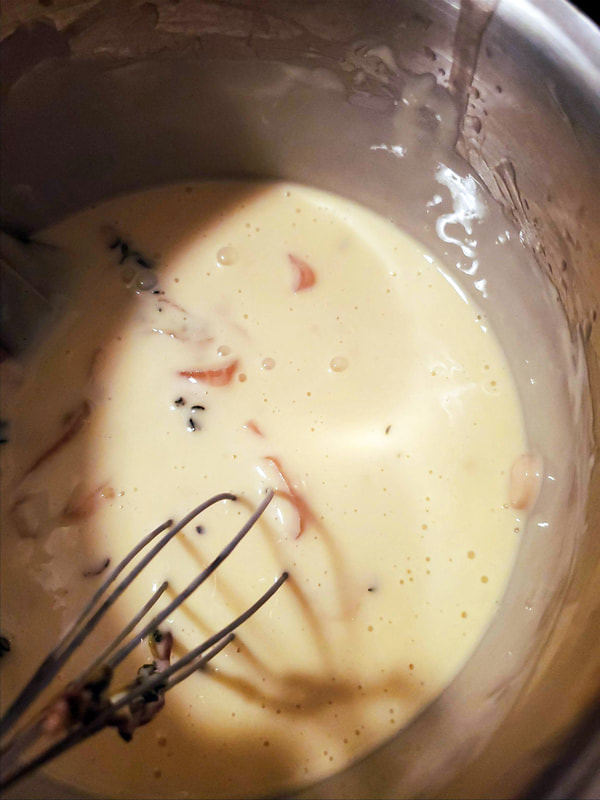
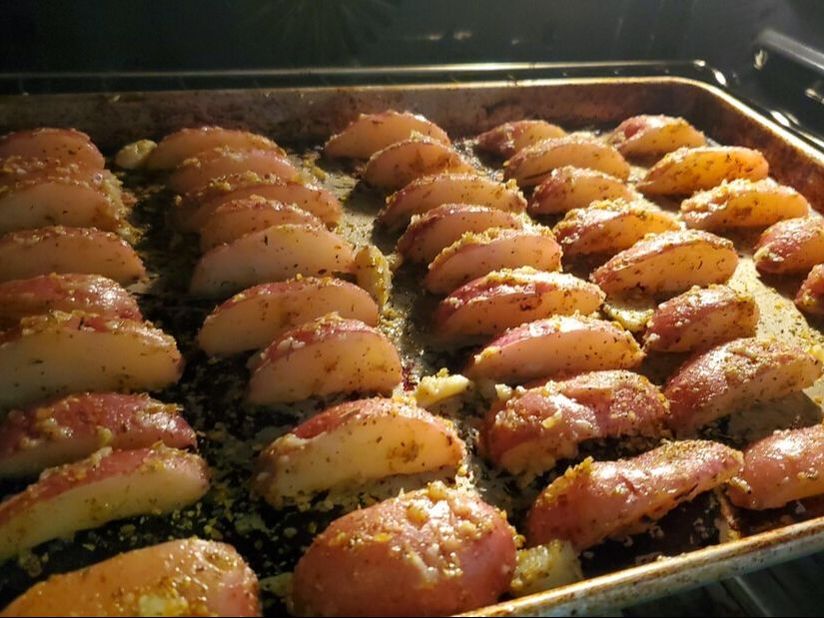
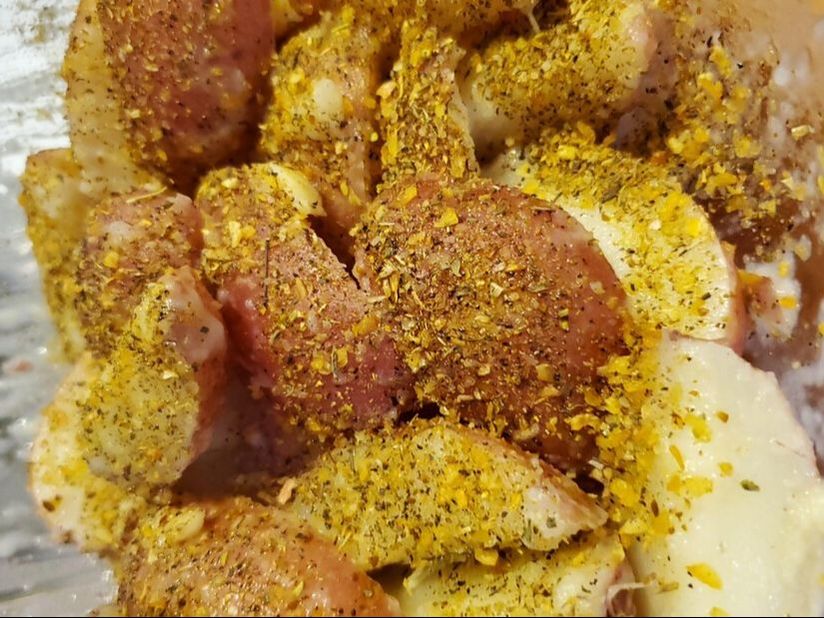
     9. Strain through colander, try to remove as much water as possible without breaking the potato
   10. Place the simmered potatoes in a clean bowl, toss with the remaining (1oz) 127 Blend and softened butter. Toss              gently until evenly coated.
    11. Coat the Roasting Pan with the EVOO, spread around to cover the entire surface area.
    12. Pour the butter coated potatoes onto the oiled roasting pan.
    13. Uniformly place potatoes on a “Cut” side down and Evenly spaced out.
  • This will allow the oil on the pan to heat evenly, the air to flow evenly around and will help the potatoes brown evenly and cook faster
    14. Place Roasting pan with potatoes on the Middle Rack
    15. Cook for 25 mins.
    16. Remove the pan from the oven, check the brownness on the cut side down. Flip each potato to the other “Cut”               side down, to brown that side.​
  •  If not browned yet continue to cook for 10 mins.
    17. Place Potatoes back in the oven and continue to cook for an additional 20-30 Mins. Until all sides are nice evenly             Browned.
    18. Remove from oven, allow to cool slightly.
    19. Place Potatoes on your favorite serving tray and Enjoy!!
    20. The methods used to prepare and cook the potatoes, they will have a nice crispy brown outside with a fluffy                    pipping hot inside!
Picture
Picture

127 Blend – Honey Balsamic Vinaigrette

4/16/2020

 
Picture
​Difficulty: Easy
Yield: 2 cups
Mise en Place
  • Blender
  • Measuring cups
  • Measuring spoons
  • Rubber Spatula
  • Tasting Spoon
​Master Grocery List
  • Balsamic Vinegar
  • White vinegar
  • Dijon Mustard
  • Shallot
  • Fresh Basil
  • Here’s the Deal Spice Co. 127 blend
  • Honey
  • EVOO (extra virgin olive oil)
​Ingredients
  • 3 ¾ Tablespoon Balsamic Vinaigrette
  • 2 ¼ Tablespoon White Vinegar
  • 1 Tablespoon Dijon Mustard
  • 1 each small Shallot
  • 1 Tablespoon Fresh Basil (stems removed)
  • 2 Tablespoon 127 Blend Here’s the Deal Spice Co.
  • 2 Tablespoon Honey
  • 1 1/3 Cups Extra Virgin Olive Oil
Recipe
  1. Remove skin from the shallot, cut up into ¼ inch chunks.
  2. Remove stems from basil, rough chop the leaves
  3. Measure out your EVOO, Vinegar, Mustard and Seasonings
  4. In your Blender, add everything except the EVOO.
  5. Puree on Medium speed until everything is incorporated.
  6. Place on low speed, Drizzle the EVOO in a slow steady stream into the blender vinegar mixture.
  7. Once fully incorporated, turn off blender, taste, adjust seasonings if needed
  8. Place into a sealable container, label it and date it
Should last in your refrigerator for 7-10 days
*The Mustard will help allow the Oil and the vinegar become emulsified.
 
Glossary
Emulsion: when two liquids that normally cannot be combined smoothly…. A classic example; Oil and Water.  Emulsifying is done slowly and sometimes Drop by Drop add ing one ingredient to another while at the same time mixing rapidly. When emulsified properly the mixture should be thick and satiny in texture.  (Examples of emulsions = Mayonnaise, Hollandaise) 
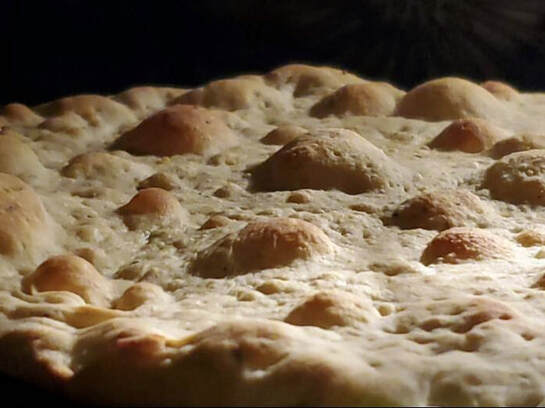
127 Blend – Pizza Crust

4/15/2020

 
Picture
Meter- Easy
Yield - (4) 10- 12 inch crust
Mise en Place
  • 3 Bowl (stainless steel or ceramic)
  • 1 Mixer Bowl
  • Whisk
  • Thermometer
  • Measuring Cups
  • EVOO - in cup
  • Pastry Brush
  • Plastic Wrap
  • Timer
  • Parchment Paper
  • Rolling Pin
  • Baking Stone (or a Pizza Tray lined with Parchment Paper)
 

​Ingredients 
  • 1 Package – (2 ¼ tsp) Active Dry Yeast
  • 1 1/3 cup Warm Water- (107◦F – 112° F)
  • 1 Tablespoon Granulated Sugar
  • 3 ½ Cup All Purpose Flour
    • (might need extra ¼ cup APF)
  • 2 Tablespoon Extra Virgin Olive Oil   
  • 3 Tablespoon 127 Blend Here’s the Deals Spice Co  
  • ¼ Cup Corn meal
​Master ingredient list
  • Active dry yeast
  • Granulated sugar
  • All-purpose flour
  • EVOO
  • Kosher salt
  • 127 Blend – Here’s the Deal Spice Co.
  • Cornmeal
Picture
Picture
​Recipe 
  1. In a Larger Bowl (at least 2 ½ cups Volume), place Sugar in bottom, add your Warm Water and Yeast, stir briefly with a fork to incorporate the ingredients. (do not over stir, you want to keep the water as warm as possible)
  2. In another bowl (Or a Mixer Bowl), Place the All Purpose Flour, and Salt, mix with whisk. Add EVOO and 127 Blend. Mix with Whisk again. 
  3. Once the Yeast Mixture has had time to dissolve and has created Bubbles on top (7-15 mins), Stir Briefly with fork and add it to the Flour Mixture.  Knead for 10 mins with the Dough hook or by hand. Low speed. Until the dough is sticky, smooth and elastic.
  4. In a Clean Bowl, coat the bottom and sides of the bowl with EVOO.
  5. Remove the dough from mixer bowl, (dust your hands with Flour before removing the dough) Place Dough in the oiled bowl, then flip once to coat the dough with the oil that is in the bowl.  (this will keep your dough from drying out and allow it to proof evenly)
  6. Cover The bowl with the dough in it, with Plastic Wrap. Place in a warm area away from direct sunlight. (70°F to 83°) Allow to Proof until doubled in size. (1 – 1 ½ hours) I Write the Time on top of the plastic wrap, to help me know how long its been proofing.
While that is rising, clean up after yourself.
  1. On a Sheet Tray or Cookie Sheet, Line with Parchment paper, Dust with Corn Meal.
  2. Clean an area for your Rolling Station. Here you will need a bench knife (Plastic or Metal), Cup of All Purpose Flour, Rolling pin, Corn meal, EVOO in a small cup, Pastry Brush.
  3. Once your dough has doubled in size, remove the plastic wrap, punch the dough down, knead for 1-2 mins.  Cut the Dough Ball in Quarters, Roll back into 4 Balls, Dust your Rolling station with APF (All Purpose Flour) Place dough balls on your Rolling station. Cover each Ball of dough with Plastic Wrap and allow to Rest for 15 Minutes.
**Option here- See Below
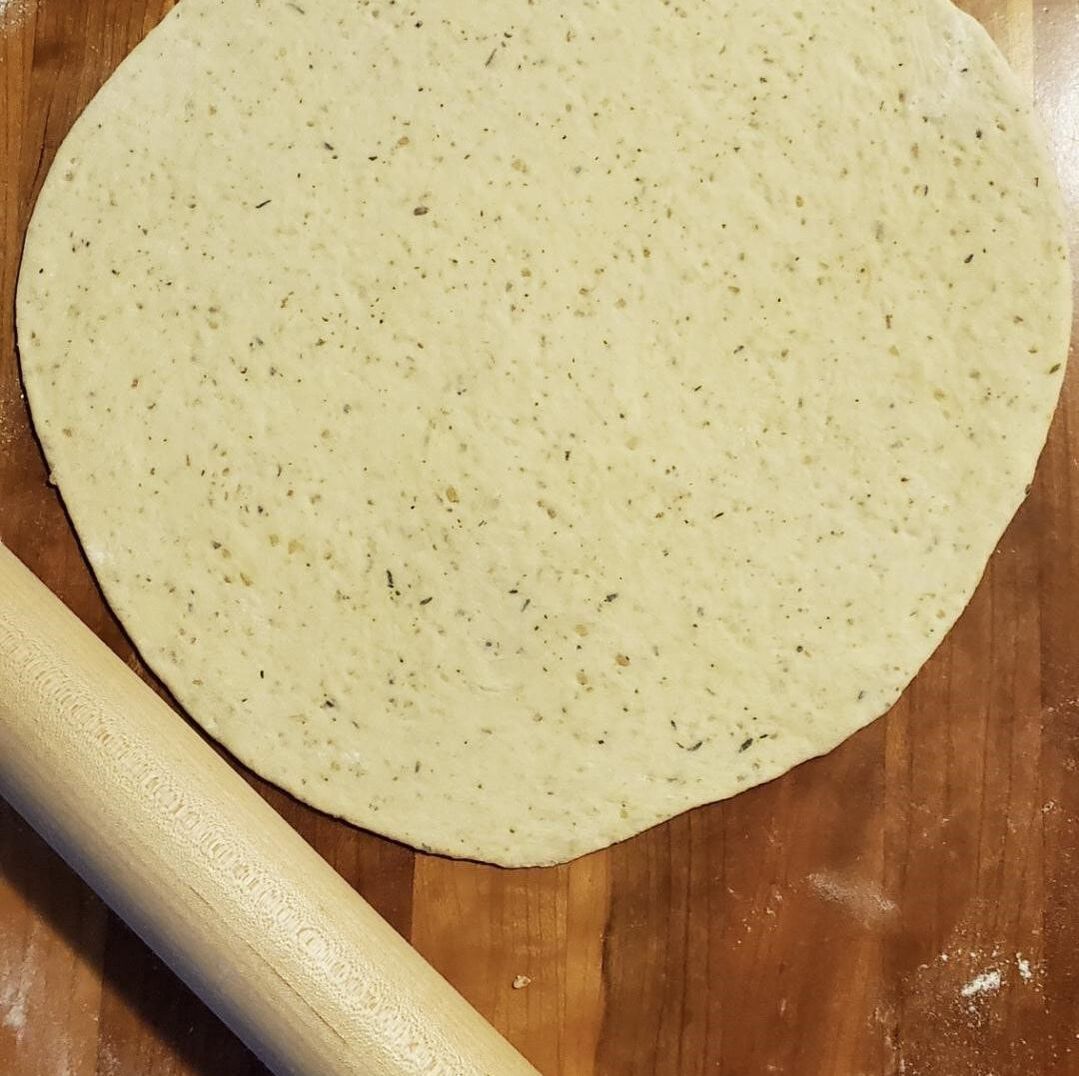
Pre- Heat your Oven to 400°F
Place your Pizza Stone in the oven on the middle rack. 
  1. Once your dough has had time to rest, work with one ball at a time, on a highly floured surface.  Flatten the dough, use your hands and rolling pin.  Roll into a Circle, about ¼ inch thick. Try not to tear the dough. Should try to be 10-12 inch Circles or Shapes. 
  2. Place the Desired shaped dough on the sheet tray with parchment and Corn Meal.  Use a Large Tined Fork to “Dock” the Dough. (this is to prevent bubbling)
  3. Brush Dough with EVOO, dust with Cornmeal. 
Repeat with the rest of the Dough Remaining
  1. Once Done with one Dough, slide it onto the Hot Pizza Stone, Set Timer for 5-7 Mins.
  2. Use a Metal Offset Spatula or your hands to remove the Dough, place on a cutting board.
If Bubbling occurred, push down on the Bubbles with your fingers. 
  1. This is where you can apply your sauce of choice, toppings and cheeses.
  2. When I Assemble my Pizza's I work on an inverted cookie tray, this allows for a smooth transfer to the hot Pizza Stone. (see picture below)
  3. Place Assembled Pizza back into the Oven on the Pizza Stone.  Cook until Pizza is at your desired done-ness. 
Remove, allow to cool (2 mins)
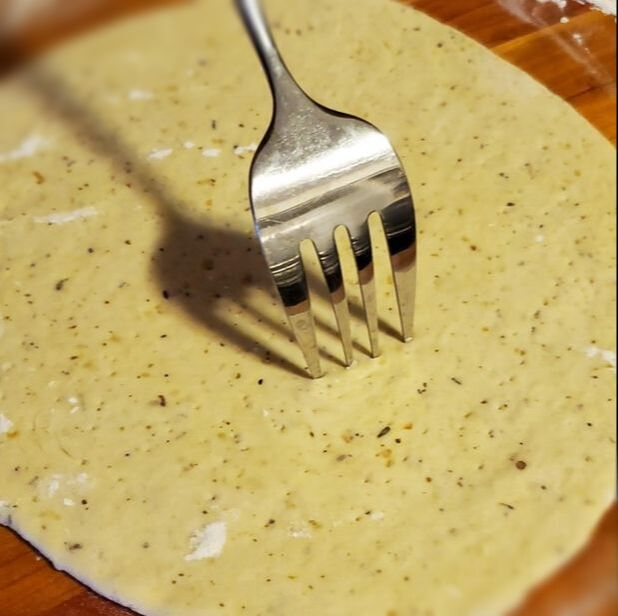
Cut into Desired shapes and Enjoy
** If you are not going to eat this right away, Pre-heat oven to 325°F.  Par Cook the Crusts until 75% cooked. Remove from oven, cool, wrap in plastic wrap each crust individually and Freeze
Picture
Picture
Picture
Picture

127 Blend – Lemon Chicken Soup

3/25/2020

 
Picture
Mise en Place
  • Stock Pot (3 gallon)
  • Rubber Spatula
  • Cutting board
  • Knife

Ingredients
  • 1 oz Fat (Bacon Fat, Butter, EVOO, Canola Oil)
  • 3 Cups Yellow Onion (Medium Dice)
  • 2 Cups Carrots (Medium Dice)  
  • 2 Cups Celery Washed (Medium Dice)
  • 2 Gallons Chicken Stock (or low sodium Broth)
  • 2 Rotisserie Chickens (remove skin, eat if necessary)
  • Pick the Meat off the Bones, Breast and Legs (Reserve)
  • Pour out the Juice from the bottom of the container (Reserve)
  • 3 Tablespoons Fresh Thyme – Picked and rough chop
  • 4 each Lemons (just need the Zest) (micro plain)
  • 4 Tablespoons 127 Blend (Here’s the Deal Spice Co.)
Picture
​
  • We Love Bacon!! We also keep our rendered bacon fat for other uses. Such as Soups, Fried Potatoes, Baked Root Vegetables or Eggs tomorrow morning!!!
  • With your “Mirepoix” carrot, onion, celery and the Herb Stems Scrap.  Keep these trimmings and use for your next Stock opportunity.  

Recipe
  1. Cut your Mirepoix to specific sizes.
  2. In your stock pot, warm your Fat over Medium heat.
  3. Once hot, add in your Carrots and Celery. Sauté for 1 minute
  4. Add in your Onions, Sauté for 4 mins
  5. Add in your Rendering of the Rotisserie Chicken (Jus)
  6. Add in your Stock, continue to cook over Medium heat until soup simmers.
  7. Once at a simmer, lower to Low Heat.
  8. Add in Picked Meat from Rotisserie
  9. Add in Fresh Thyme and Lemon Zest  
  10. Add in 127 Blend, Stir to incorporate

Serve Immediately or when ready.
Cool Down Properly and Quickly.
Eat within 4 days or freeze for up to 40 days.
Picture

    Filters

    All
    127 Blend
    BBQ Rib Rub
    Bloody Mary Essential Rim Seasoning
    Togarashi
    Wing Blend

    Archives

    February 2022
    November 2021
    April 2021
    March 2021
    January 2021
    December 2020
    April 2020
    March 2020

    RSS Feed

Picture

Follow Us

Facebook
Instagram
​

Support

FAQs
Shipping

Contact

Email
Plymouth, Minnesota
  • Home
  • Products
  • Recipes
  • Find Us
  • FAQs
  • About